Hello, dear readers of the My Crafts Ideas blog! I hope this post finds you well and eager to dive into a new crochet adventure. Today, I want to introduce you to a pattern that is very dear to me: the Ripple Afghan blanket.
SEE A NEW PATTERN HEREThis pattern is not just a project; it’s a journey through the undulating waves of yarn that create a piece rich in texture and tradition. My fascination with the Ripple Afghan began years ago, sparked by a vintage pattern I found in my grandmother’s collection. Its timeless appeal and the rhythmic beauty of its peaks and valleys captured my imagination, and I knew it was a design I had to share with you all.
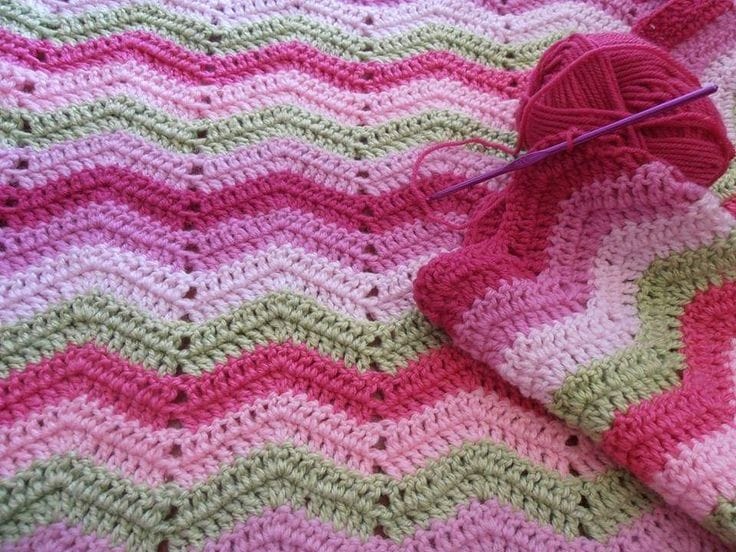
A Wave of Tradition and Modernity
The Ripple Afghan, often celebrated for its wave-like design, carries a legacy that spans several generations. Its origins, while not precisely documented, are deeply rooted in the craft of crochet, gaining popularity in the mid-20th century. This pattern, with its mesmerizing texture, serves both functional and decorative purposes, adorning homes with its cozy warmth and aesthetic charm.
The beauty of the ripple pattern lies in its versatility—it can be customized in endless color combinations and sizes, making it a perfect project for both beginners and seasoned crocheters. As we explore this pattern together, I invite you to consider it as more than just a blanket; it’s a canvas for creativity, a link to past crafters, and a cozy embrace in yarn form.
SEE A NEW PATTERN HEREGathering Your Ripple Essentials
Before the first stitch, it’s crucial to gather the right materials and understand the stitches that will bring your Ripple Afghan to life. This section will guide you through choosing your yarn and tools, and give you a primer on the essential stitches used in the pattern.
Materials Needed
- Yarn: The Ripple Afghan invites you to play with colors. Whether you prefer the classic look of a two-tone wave or a rainbow of hues, choose yarns that reflect your personal style. Acrylic yarn is favored for its durability and ease of care, making it ideal for blankets. However, for a touch of luxury, consider wool or cotton blends for their warmth and softness.
- Crochet Hook: The size of your hook can affect the tightness of your stitches and the overall texture of your blanket. A 4mm (US G/6) hook is recommended, but always refer to your yarn’s label for guidance or adjust according to your tension.
- Scissors and Yarn Needle: Sharp scissors make cutting yarn easy, and a yarn needle is essential for weaving in ends, ensuring your blanket has a neat finish.
Stitches and Abbreviations
Understanding the basic stitches and abbreviations is like learning the language of crochet. For the Ripple Afghan, you’ll primarily use:
- ch (chain)
- dc (double crochet)
- yo (yarn over)
- 3 st dec (3 stitch decrease), also known as dc3tog, which helps form the ripple effect by decreasing stitches.
- 2 st dec (2 stitch decrease), or dc2tog, another decrease stitch that contributes to the afghan’s characteristic peaks and valleys.
Ripple Afghan Blanket Diagram
The pattern’s diagram or guide provides a visual representation of how the stitches come together, illustrating the alternation between increases (for peaks) and decreases (for valleys) that create the ripple effect. Beginning with a chain that’s a multiple of 16 plus 2 stitches allows for the pattern to repeat seamlessly across the width of the blanket.
Tutorial Overview
The creation process for the Ripple Afghan consists of repeating rows that form the V-shaped peaks and valleys. Here’s a brief overview to get you started:
- Foundation Chain: Your project’s width dictates the number of chains you start with, based on the multiple of 16 plus 2 formula.
- Row 1: Starting in the third chain from your hook, you’ll work a series of double crochets, increases, and decreases to begin shaping the ripple pattern.
- Row 2 and Beyond: Continue with the pattern, repeating the sequence of stitches that create the undulating effect of the blanket.
This rhythmic repetition of increases and decreases is what gives the Ripple Afghan its captivating texture and visual appeal.
Full Pattern: Click Here
Creating Your Ripple Afghan: Step-by-Step Guide
Embarking on the Ripple Afghan project is like painting with yarn—each stitch contributes to a larger picture of waves and textures. Let’s break down the process into detailed steps to guide you from start to finish.
Starting Your Afghan
- Begin with the Chain: Based on the desired width of your blanket, start by chaining a multiple of 16 plus an additional 2 chains. For a standard throw, you might chain 130 (for a 40-inch width in worsted weight yarn).
- Row 1 – Establishing the Ripple Pattern:
- Double crochet (dc) in the 3rd chain from the hook. This counts as your first dc.
- Dc in the next 6 chains, then make 3 dc in the next chain to form the first “peak”.
- Dc in the next 6 chains, then perform a 3 stitch decrease (dc3tog) over the next 3 chains to create the first “valley”.
- Repeat the pattern across the chain, ending with a 2 stitch decrease (dc2tog) in the last two chains.
- Row 2 – Continuing the Pattern:
- Chain 2 (counts as your first dc) and turn your work.
- Skip the first stitch (very base of the chain 2), then dc in the next 7 stitches.
- Make 3 dc in the next stitch for the peak, followed by dc in the next 6 stitches.
- Perform a 3 st dec over the next 3 stitches to form the valley and continue the pattern as established.
- Repeat Row 2: Continue repeating Row 2 for the pattern, maintaining the peaks and valleys. The beauty of the Ripple Afghan comes from its repetitive nature, which allows for a meditative and satisfying crafting experience.
Changing Colors
To add visual interest and personality to your Ripple Afghan, you might want to introduce new colors:
- To Change Colors: At the end of a row, when you have 3 loops left on your hook for the final stitch, yarn over with the new color and pull through all 3 loops. Chain 2 and turn, continuing with the new color.
- Tip for Clean Color Changes: Leave a tail of about 5-6 inches when you change colors so you can weave in ends securely and maintain a neat finish.
Finishing Your Blanket
- Weaving in Ends: Use a yarn needle to weave in all loose ends. This not only secures your work but also ensures that the back of the blanket is as neat as the front.
- Blocking: Depending on the yarn you’ve chosen, you might consider blocking your finished blanket. Blocking can enhance the drape, even out stitches, and give your blanket a professional finish.
The Ripple Afghan is a project that offers both a comforting rhythm in its creation and a stunning result in its completion. Whether draped over a couch or wrapped around a loved one, the afghan you’ve created is a testament to the enduring appeal of crochet and the joy of making something beautiful by hand.
Remember, each row you’ve completed is a line in the story of your crafting journey. The waves of your Ripple Afghan are not just a pattern but a narrative of patience, creativity, and warmth woven together, stitch by stitch.
I hope this guide inspires you to start your Ripple Afghan and infuses your crocheting experience with joy and a sense of accomplishment. Happy crocheting!


