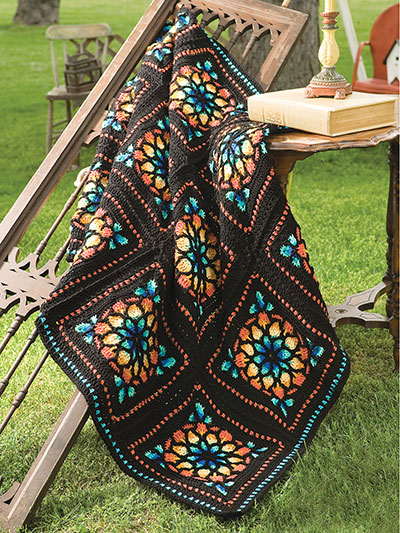
The Stained Glass Afghan is a crochet project known for its beauty and complexity. Inspired by colorful stained glass, this pattern is perfect for those seeking a creative challenge with a visually stunning result. In this comprehensive guide, we will explore every aspect of the Stained Glass Afghan, from choosing the right materials to finishing touches, ensuring you have all the information needed to create a masterpiece.
How to Make the Stained Glass Afghan Crochet Pattern
Required Materials
Creating a beautiful Stained Glass Afghan requires the right materials. Here is a detailed list of what you will need:
- Colorful Crochet Yarns: Opt for vibrant colors that mimic the look of stained glass. Popular choices include reds, blues, greens, and yellows.
- Crochet Hook: Choose a hook that matches the yarn weight. Common sizes for afghans are H (5.0 mm) or I (5.5 mm).
- Scissors: A sharp pair of scissors for cutting yarn.
- Tapestry Needle: For weaving in ends and sewing pieces together.
Step-by-Step Guide
Choosing Colors:
Selecting the right colors is crucial for achieving the stained glass effect. Consider using a color wheel to help with combinations. Complimentary colors or those opposite each other on the color wheel can create striking contrasts.
Starting the Pattern:
Begin with a magic ring, which provides a firm base. Here’s a detailed explanation of how to create a magic ring:
- Form a Loop: Hold the yarn tail in your left hand and wrap the yarn around your fingers to create a loop.
- Insert Hook: Insert your hook into the loop and pull up a loop of yarn.
- Chain Stitch: Chain one to secure the loop. You now have a foundation to begin your stitches.
- Work Stitches: Work the required number of stitches into the loop. Pull the tail to tighten the loop.
Building the Design:
The design of the Stained Glass Afghan is built using a series of motifs or blocks. Each block can be made separately and then sewn together. Here are some common steps:
- Follow the Chart: Use a pattern chart to guide your stitches. Charts are visual representations of the pattern and can be easier to follow than written instructions.
- Maintain Consistency: Ensure that your stitches are uniform and tension is consistent.
- Join the Blocks: After completing all the blocks, sew them together using a tapestry needle. Be careful to align the edges perfectly to maintain the design.
Finishing Touches:
Completing your afghan with a well-crafted finish is essential. Here are some tips:
- Border: Add a decorative border to your afghan. Common borders include scallops, picots, or simple single crochet edges.
- Blocking: Block your afghan to set the stitches and even out the shape. Dampen the afghan, lay it flat on a towel, and shape it to the correct dimensions. Allow it to dry completely.
- Weaving in Ends: Use a tapestry needle to weave in all loose ends securely.
Tips for a Perfect Result
Stitch Tension:
Maintaining consistent tension is key to a uniform afghan. If your tension varies, your blocks may not align properly. Practice maintaining even tension before starting your project.
Color Blocks:
Using distinct color blocks can enhance the stained glass effect. Here are some additional tips:
- Contrast: Choose colors that contrast well to make each block stand out.
- Variety: Mix different shades within the same color family to add depth and interest.
- Sample Swatches: Create sample swatches to see how your chosen colors look together before committing to the full afghan.
Seam Care:
Ensure the seams between color blocks are well-made and discreet. Here’s how to do it:
- Invisible Seams: Use the mattress stitch for invisible seams. Place two blocks right sides up, insert the needle into the edge of the first block, then into the edge of the second block, and pull tight. Repeat along the edge.
- Secure Ends: Always secure your yarn ends by weaving them back and forth to prevent unraveling.
Benefits of Making the Stained Glass Afghan
Aesthetic Appeal:
This pattern offers a unique and sophisticated look, making it a standout piece in any setting. The intricate design and vibrant colors mimic the beauty of stained glass windows, adding a touch of elegance to your home décor.

FULL PATTERN: CLICK HERE
Creativity:
Creating a Stained Glass Afghan allows you to explore your artistic skills, providing a great way to express your personal style. The project encourages experimentation with colors and patterns, making each afghan unique.
Gift Giving:
A handmade afghan makes an amazing gift for special occasions. Whether for a wedding, birthday, or holiday, a Stained Glass Afghan is a thoughtful and cherished gift that showcases your effort and creativity.
Detailed Techniques and Tips
Magic Ring Technique
The magic ring is a foundational technique for many crochet projects, especially those worked in the round. Here’s a more detailed breakdown:
- Form the Loop: Wrap the yarn around your fingers to form a loop, with the tail end on top.
- Insert Hook: Insert the hook into the loop from front to back.
- Yarn Over: Grab the working yarn with your hook and pull it through the loop.
- Chain Stitch: Make a chain stitch to secure the loop.
- Work Stitches: Crochet the required number of stitches into the loop. Once done, pull the tail end to tighten the loop and close the ring.
Blocking Your Afghan
Blocking is an essential step to finish your crochet project. It ensures that the afghan holds its shape and the stitches settle into place.
- Dampen the Afghan: Spray the afghan with water until it’s damp but not soaked.
- Lay Flat: Place the afghan on a flat surface, like a blocking mat or a towel.
- Shape the Afghan: Gently stretch and shape the afghan to the correct dimensions. Use pins to secure it in place if necessary.
- Dry Completely: Allow the afghan to dry completely before removing the pins.
Creating a Decorative Border
Adding a border to your afghan enhances its appearance and provides a polished finish. Here’s how to create a simple scallop border:
- Single Crochet Edge: Work a round of single crochet around the entire edge of the afghan.
- Scallop Pattern: In the next round, skip two stitches, work five double crochets into the next stitch, skip two stitches, and single crochet into the next stitch. Repeat around the afghan.
Common Mistakes and How to Avoid Them
Inconsistent Tension:
Inconsistent tension can lead to blocks that don’t match in size. Practice maintaining even tension, and check your work frequently to ensure uniformity.
Color Bleeding:
Some yarns may bleed colors, especially vibrant ones. Test your yarns for colorfastness by soaking a small swatch in water and checking for color bleed. Wash your finished afghan gently in cold water with a color-safe detergent.
Skipping Blocking:
Skipping the blocking process can result in an uneven afghan. Always block your finished pieces to set the stitches and even out the shape.
Advanced Techniques
Overlay Crochet
Overlay crochet is a technique that adds a 3D effect to your afghan. It involves working stitches over previous rounds to create raised designs. Here’s a basic overview:
- Work Base Layer: Create the base layer of your afghan as usual.
- Overlay Stitches: Work the overlay stitches by inserting your hook into a stitch from a previous round and pulling up a loop.
- Complete Stitch: Complete the stitch as instructed, ensuring it lays over the base layer.
Joining As You Go
Joining as you go (JAYG) is a method of joining blocks without sewing. This technique saves time and ensures neat joins. Here’s how to do it:
- Work Last Round: When you reach the last round of a block, stop before the final join.
- Join to Adjacent Block: Instead of completing the last join, insert your hook into the corresponding stitch of the adjacent block, pull up a loop, and complete the stitch.
- Continue: Continue joining in this manner for the rest of the block.
For more crochet tips and patterns, check out our other articles:


