Ever since my grandmother introduced me to the gentle art of crochet under the warm glow of her old-fashioned reading lamp, I have been in love with the rhythmic clicking of the crochet hooks and the endless possibilities of yarn. She had a particular fondness for vintage patterns, her creations often evoking the elegance and charm of a bygone era. Years later, as I stumbled upon the vintage fan ripple stitch, memories of her cozy living room and the stacks of colorful afghans came flooding back, reminding me of the rich history and timeless beauty embedded in these traditional designs.
SEE A NEW PATTERN HERE
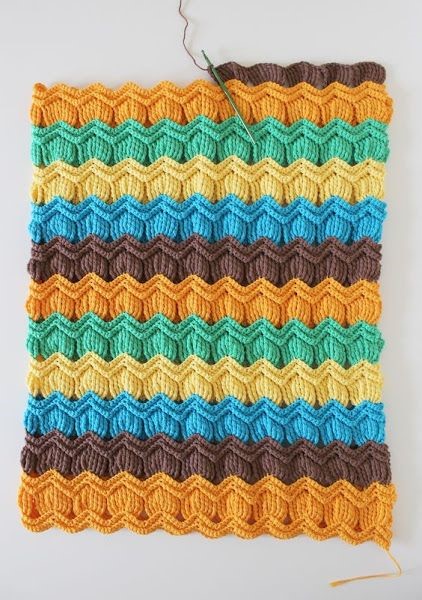
The vintage fan ripple stitch, with its undulating waves and intricate fan-like motifs, particularly caught my eye. It was not just a stitch; it was a bridge to the past, a testament to the enduring allure of crochet through generations. This discovery inspired me to delve deeper into its origins and to explore how this beautiful pattern could be adapted to contemporary crochet projects, preserving its classic appeal while infusing it with modern sensibility.
A Stitch Through Time: Exploring the Vintage Fan Ripple
The vintage fan ripple stitch is more than just a method of looping yarn through a hook; it is a piece of history woven into each loop and chain. Originating possibly as early as the Victorian era, this stitch pattern has gracefully stood the test of time, making its way into the hearts and homes of many over the decades. It is characterized by its rhythmic, wavelike ripples, complemented by fan-shaped motifs that add a sophisticated flair to any piece. The allure lies in its duality—simple enough for beginners to grasp, yet capable of creating complex, breathtaking designs that appeal to seasoned crocheters.
This stitch pattern has seen a resurgence in popularity, not just for its aesthetic appeal but for its comforting connection to the past. As we explore the intricacies of the vintage fan ripple stitch, we embark on a journey through time, reviving the elegance and charm of a bygone era in our modern-day projects. Let’s delve deeper into why this stitch continues to captivate crafters and how it can be a perfect addition to your crochet repertoire.
Full Pattern: Click Here
Envisioning Your Project: Materials and Preliminary Considerations
SEE A NEW PATTERN HEREBefore diving into the vintage fan ripple stitch, it’s essential to gather your materials and visualize the project at hand. Whether you’re aiming to craft a delicate shawl or a cozy throw, the right tools and yarn will make all the difference. Here’s what you’ll need to begin:
- Crochet Hook: Size 8 (5.0 mm) is ideal for this pattern, providing the perfect balance between tight stitches and ease of handling.
- Yarn: Choose two contrasting colors to highlight the ripple effect and fan motifs. The yarn should be compatible with your hook size and comfortable to work with.
- Yarn Needle: For weaving in ends once your project is complete.
- Stitch Marker: Helpful for marking the beginning of rounds or noting specific stitches.
- Scissors: To cut the yarn when you’re finished or when changing colors.
As you prepare your materials, consider the color scheme and the final use of your project. The vintage fan ripple stitch lends itself beautifully to various applications, each requiring a different approach to yarn and color choices. Whether it’s a gift or a personal piece, taking the time to plan can enhance the enjoyment of your crafting experience.
Step-by-Step Instructions: Crafting the Vintage Elegance
Embarking on your vintage fan ripple stitch project begins with a simple chain, setting the foundation for the delicate waves and intricate fans that define this classic pattern. Here’s how to bring this timeless stitch to life:
- Starting Your Project:
- Begin by making a foundation chain of 87 stitches for a smaller project or 103 stitches for something a bit larger. This initial step creates the base from which your ripple pattern will emerge.
- Row 1: Establishing the Base:
- Start in the second chain from your hook, single crochet in each chain across. Turn your work. You should have 86 stitches for the smaller size or 102 stitches for the larger size. This row sets a smooth, even base for your ripples.
- Row 2: Introducing the Ripple:
- Chain 3 (this counts as your first double crochet). Double crochet in the same first stitch. Skip the next 2 stitches, then single crochet in the following stitch. Continue this pattern across the row. Skip the last 2 stitches, then double crochet in the last stitch. Turn your work. This row starts to form the gentle ripple effect that is characteristic of this pattern.
- Rows 3-5: Continuing the Pattern:
- Repeat Row 2 for the next three rows. With each row, the ripple pattern becomes more defined, and the fabric begins to take on a wavy, textured look.
- Row 6: Deepening the Ripple:
- Start this row by chaining 3 (counts as a double crochet), then double crochet in the first stitch. Skip 2 stitches and make a single crochet decrease over the next 2 stitches. This decrease is often referred to as “sc2tog” (single crochet two together). Continue this pattern across the row, ending with a double crochet in the last stitch. This row accentuates the ripple effect, adding depth to your pattern.
- Rows 7-9: Enhancing the Texture:
- Repeat the pattern established in Row 6 for the next three rows. These rows deepen the ripples, creating a more pronounced wave effect in your fabric.
- Row 10: Finalizing the Ripple:
- Chain 3 (counts as a double crochet) and proceed with a double crochet decrease over the next two stitches, referred to as “dc2tog” (double crochet two together). Repeat this decrease pattern across the row until you reach the last stitch, where you’ll make one final double crochet. Fasten off your yarn and weave in any loose ends.
Additional Tips for a Flawless Finish
- Tension Matters: Keep a consistent tension to ensure your ripples are even and uniform. If your tension is too tight or too loose, it may affect the overall appearance of the stitch pattern.
- Color Choices: Experiment with different color combinations to highlight the unique texture of the vintage fan ripple stitch. Changing colors every few rows can add a dynamic visual effect to your project.
- Blocking: Once completed, consider blocking your project. This finishing touch can help even out your stitches and give your work a more professional, polished look.
As you fasten off the last stitch of your vintage fan ripple project, take a moment to appreciate the journey. From the initial chain to the final weave-in, you’ve not only created a beautiful piece but also connected with a timeless tradition. The vintage fan ripple stitch, with its elegant waves and sophisticated motifs, offers a bridge to the past while showcasing your crochet skills in the present.
Whether it’s destined to be a cherished gift or a personal keepsake, your creation carries the legacy of generations of crafters. It’s a testament to the enduring beauty of crochet and the endless creativity it inspires. As you continue to explore and experiment with this versatile stitch, may each loop and chain stitch you closer to the past, enriching your crafting journey with each wave of your hook.
Now that we’ve woven through the steps and tips for creating a vintage fan ripple masterpiece, what project will you embark on next? Will you challenge yourself with a larger blanket, or perhaps gift a friend with a delicate scarf? Whatever your choice, the vintage fan ripple stitch is sure to add a touch of elegance and history to your crochet endeavors.


