Creating a quilt has always been a way for me to connect with my past and to honor the traditions of my family. I remember sitting beside my grandmother, watching her nimble fingers dance over the fabric as she crafted beautiful quilts with intricate patterns.
Her quilts were not just blankets; they were stories told through stitches, capturing moments of love, joy, and heritage. This legacy inspired me to create my own quilts, blending traditional techniques with my personal touch. One of my favorite projects is the “Dream Catcher” quilt, a piece that embodies creativity and a deep appreciation for the art of quilting.
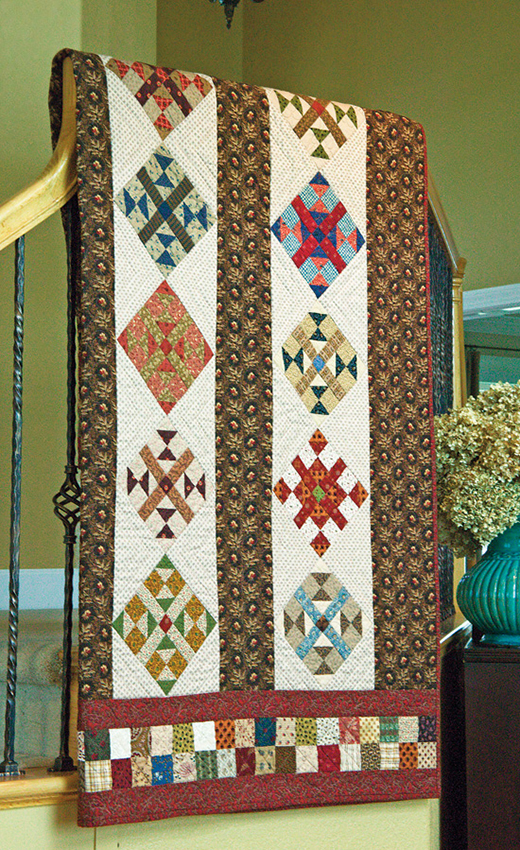
The “Dream Catcher” quilt is a perfect example of how different fabric values and arrangements can transform a single block design into a captivating masterpiece. Marcie Patch, the designer, has crafted a quilt that is not only visually stunning but also a delightful challenge for intermediate quilters. This quilt, with its mix of light, medium, and dark prints, invites you to experiment with color and value to create a unique and personal piece.
Exploring the Value of Creativity in the Dream Catcher Quilt
The “Dream Catcher” quilt is a testament to the power of creativity in quilting. The magic of this quilt lies in its use of fabric values—the lightness or darkness of the fabric. By playing with different value arrangements, each block in the quilt can look remarkably different, despite being the same design. This allows for endless possibilities and personal expression in your quilt-making journey. The “Dream Catcher” quilt encourages you to dive into your stash and mix and match prints to create a truly one-of-a-kind piece.
Preparing for the Dream Catcher Quilt Project
Materials
Before diving into the construction of your “Dream Catcher” quilt, gather the following materials:
- Assorted light, medium, and dark prints (for blocks): 2½-2⅞ yards total
- Cream/brown print (for setting triangles): 1⅛ yards
- Brown floral (for vertical strips): 2⅛ yards
- Rust print (for horizontal strips and binding): 1¾ yards
- Assorted dark prints and assorted light tan prints (for pieced border): ⅜-½ yard each
- Backing (piece lengthwise): 5⅜ yards
- Batting size: 78″ x 96″
Setting the Stage for Your Quilting Adventure
Before you begin piecing your blocks, take some time to plan your fabric choices and value placements. Studying the provided photos for inspiration or creating your own arrangements can help you achieve a variety of looks. Consider cutting and piecing one block at a time to ensure each block’s uniqueness. Enjoy the process of mixing and matching prints, and remember that there is no right or wrong way to create your “Dream Catcher” quilt—each block is an opportunity to express your creativity.
Full Pattern: Click Here
Step-by-Step Instructions for the Dream Catcher Quilt
Piecing the Blocks
- Prepare Your Squares:
- Draw a diagonal line on the wrong side of an assorted print 2⅜” square.
- Place the marked square on a darker 2⅜” square, right sides together.
- Sew a ¼” seam on each side of the marked line. Cut apart on the marked line, open, and press to make two pieced squares. Repeat to make a total of eight matching pieced squares per block.
- Create the Block Corners:
- Using two matching pieced squares and two matching 2″ squares, sew them together to form a pieced block corner. Repeat to make four matching block corners per block.
- Assemble the Dream Catcher Block:
- Sew together four matching block corners, four matching 1½” x 3½” strips, and one 1½” square to complete the Dream Catcher Block. Repeat Steps 1-3 to make a total of 28 blocks.
Assembling the Quilt Top
- Stitch the Block Rows:
- Stitch together seven blocks and 12 cream/brown print 12″ quarter-square triangles as shown in the Assembly Diagram. Add cream/brown 7″ half-square triangles to the corners to make a block row. Trim to 10½” wide, centering the blocks. Trim row ends ¼” beyond the corners of the end blocks. Make four rows in total.
- Assemble the Quilt Top:
- Following the order in the Assembly Diagram, sew together the brown floral 74″ strips and the trimmed block rows, trimming the strips even with the rows after each addition.
- Add the Borders:
- Sew the rust print 68½” strips to the top and bottom of the quilt top.
- Stitch together 17 assorted dark and 17 assorted light print 2½” squares, alternating to make a pieced strip. Make four strips in total. Watching the orientation, sew two pieced strips to the top and two to the bottom.
- Sew the remaining rust 68½” strips to the top and bottom.
Quilting and Finishing
- Quilt Your Masterpiece:
- Layer, baste, and quilt as desired. Marcie Harris machine quilted the small squares and strips in each block in the ditch and added a four-branched swirl design in each block. The brown floral strips feature a swirl and scallop design, while the rust strips are quilted with a spiral and leaf design. Diagonal lines are quilted through the pieced border, and the setting triangles are quilted in the ditch with double lines outlining the blocks.
- Binding:
- Bind your quilt with the rust print binding strips.
Additional Tips for a Successful Quilting Experience
- Fabric Selection: Choose a variety of prints with different values to create contrast and interest in your blocks. Don’t be afraid to experiment with bold and subtle combinations.
- Piecing Accuracy: Take your time with cutting and piecing to ensure accuracy. This will help your blocks fit together more seamlessly.
- Quilting Design: Think about your quilting design before you begin. The quilting patterns can enhance the overall look of your quilt, adding texture and depth.
Completing the “Dream Catcher” quilt is a rewarding experience that allows you to explore the creative possibilities of fabric values and arrangements. Each block you create is a unique piece of art, contributing to the overall beauty of the quilt. As you stitch each piece together, you’ll not only create a stunning quilt but also carry forward the rich tradition of quilting. Enjoy the process, and let your creativity shine through every stitch.

