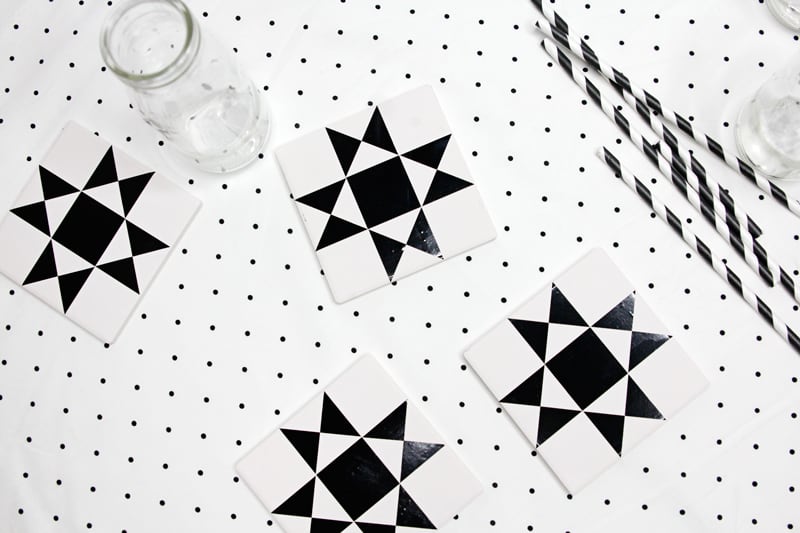
Hello there, I’m Julie, and I’m thrilled to share with you a delightful DIY project that brings together my passion for quilting and crafting. In this tutorial, I’ll guide you through creating Quilt Block Coasters, a fun and unique addition to any home decor.
SEE A NEW PATTERN HEREThis project was inspired by a personal memory that resonates with my love for quilting, and I can’t wait to show you how to bring these charming coasters to life. So let’s dive into this creative adventure together! As an avid quilter, I’ve always found joy in turning pieces of fabric into beautiful and functional works of art. The memories I’ve woven into my quilts hold a special place in my heart.
One day, as I was reminiscing about my quilting journey, I remembered a moment when I was drawn to the mesmerizing patterns of quilt blocks. That moment sparked an idea to incorporate these quilt block designs into a practical and stylish project – Quilt Block Coasters!
Materials:
- 4″ by 4″ Tile Coasters
- Premium Vinyl Permanent
- Cricut Transfer Tape
- SVG Download (available below)
Step-by-step:
Step 1: Download and Cut the Quilt Block Designs Start by downloading the SVG file for the quilt block designs. Alternatively, you can use the Design in Design Space to create the designs. These designs are perfectly sized for 4″ by 4″ tiles. If you’re using different-sized ceramic tiles, make sure to adjust the design size accordingly before cutting.
Step 2: Apply Transfer Tape Take a piece of transfer tape and press it onto the quilt block design. Ensure that the design adheres to the transfer tape properly.
Step 3: Peel Off the Backing Paper Gently peel off the white backing paper from the design while the transfer tape keeps the design intact.
Step 4: Apply the Design to the Tile Carefully position the quilt block design on the tile, making sure it’s centered. Press down firmly to secure the vinyl design onto the tile.
Step 5: Remove the Transfer Tape Peel off the transfer tape, leaving behind the vibrant and beautiful quilt block design on the tile.
Additional Tips and Techniques:
- Choosing Color Combinations: When selecting vinyl colors for your quilt block coasters, consider using hues that complement your home’s decor. Experiment with different color combinations to create a cohesive and visually appealing set of coasters.
- Precise Vinyl Application: To achieve a clean and professional look, ensure that you press the vinyl design onto the tile evenly and firmly. Using a scraper tool can help eliminate air bubbles and ensure proper adhesion.
- Centering the Design: Before applying the vinyl design, use a ruler to find the center of the tile. This will help you position the design accurately and create a balanced appearance.
- Practice and Test: If you’re new to working with vinyl, practice on a spare tile before applying the design to your final coasters. This will help you get comfortable with the process and avoid mistakes on your finished project.
- Layering Vinyl: If you want to create more intricate designs or add depth to your quilt block coasters, consider layering different colors of vinyl. Start with the base layer and then add smaller pieces on top to create dimension.
- Applying Transfer Tape: When applying transfer tape, start from the center of the design and gently press outward to avoid trapping air bubbles. This will result in a smoother application.
- Burnishing Vinyl: After applying the design to the tile, use a burnishing tool or the edge of a credit card to firmly press down on the vinyl. This step ensures better adhesion and helps the vinyl adhere to the tile’s texture.
- Sealing Vinyl Designs: If you want to make your quilt block coasters even more durable, consider applying a clear sealant over the vinyl design. This will protect the design from wear and tear over time.
- Customizing Designs: Feel free to personalize the quilt block designs to reflect your unique style. Add monograms, initials, or other elements that hold special meaning to you.
- Gift Giving: These Quilt Block Coasters make wonderful handmade gifts. Consider creating a set for a fellow quilter, a sewing enthusiast, or a friend who appreciates crafty home decor.
Full Pattern: Click Here
Remember, crafting is about creativity and exploration, so don’t hesitate to try new techniques and make these quilt block coasters your own. Enjoy the process, and let your creativity shine through in every detail of your project!
And just like that, you’ve created your very own set of Quilt Block Coasters! These coasters are not only practical but also a testament to your love for quilting and creativity. Whether they grace your coffee table or become a heartfelt gift for a fellow crafter, these coasters are sure to bring a touch of charm to any space. Don’t hesitate to tie them up with a ribbon or fabric scrap for that perfect finishing touch. Thank you for joining me on this crafting journey, and I hope you enjoy making these Quilt Block Coasters as much as I did!
Remember, the joy of crafting is in the process, and every stitch or vinyl application carries a piece of our creativity. Happy crafting, and keep quilting with love!
If you enjoyed this tutorial, explore more of my quilting projects and ideas on my blog. Don’t forget to sign up for my newsletter to stay updated on the latest patterns and tutorials!


