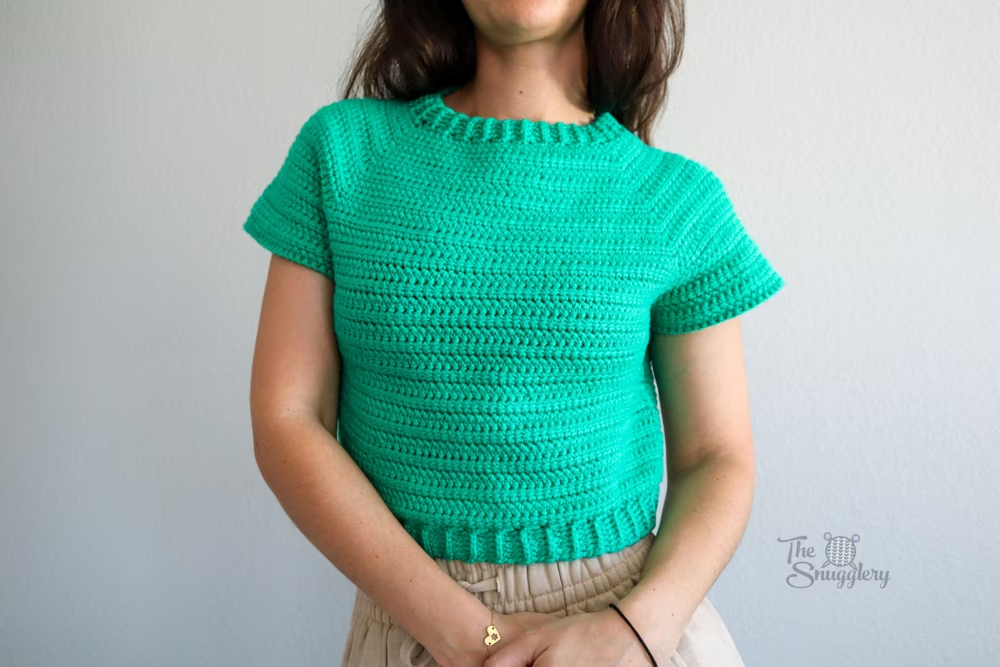
The Gemerald T-Shirt, designed by Michelle Greenberg of The Snugglery, is a top-down crochet project that combines structure with comfort using linked double crochet (ldc) and front post stitches for ribbing.
This versatile pattern offers a flattering fit and a modern, textured design, making it a staple piece for your handmade wardrobe. Whether you’re an experienced crocheter or looking to expand your skills, this pattern provides the perfect opportunity to explore new techniques and enjoy the satisfying flow of linked double crochet.
This project requires knowledge of basic crochet stitches, the linked double crochet technique, and front post stitches for ribbing. Don’t worry if you’re new to these methods—Michelle provides detailed video tutorials to guide you through every step!
Materials for Your Gemerald T-Shirt
To make the Gemerald T-Shirt, you’ll need the following materials:
- Yarn: Approximately 750 yards (690 m) of worsted weight yarn (Category 4). The sample used Juniper Moon Farm’s Cumulus (a soft blend suitable for comfortable wear).
- For sizes larger than Small, add approximately 15% more yarn per additional size.
- Hook Size: 5.5 mm (US I-9) crochet hook
- Other Supplies:
- 4 stitch markers (to mark raglan increases)
- Optional: Tapestry needle for minor finishing
Gauge: 22 stitches by 13.5 rows in a 6×6” (15×15 cm) swatch using linked double crochet.
If you prefer counting in smaller increments, aim for 9 rows within 4 inches (10 cm).
Sizing Options
This pattern provides a range of sizes to fit different bust measurements. Choose your size based on the bust circumference:
- Small: 36″ (92 cm)
- Medium: 38″ (96 cm)
- Large: 40″ (101 cm)
- Extra Large: 44″ (111 cm)
- 2X Large: 48″ (122 cm)
- 3X Large: 52″ (132 cm)
The Gemerald T-Shirt Pattern Overview
This top-down pattern begins with a shorter foundation chain and increases at four points to form the front, back, and sleeve sections. After the desired yoke length is achieved, the sleeves are separated, and the body is worked to the desired length. Finally, ribbing is added to the neckline and bottom hem to complete the piece.
Key Stitches to Master
- Linked Double Crochet (ldc): The main stitch used in this pattern, linked double crochet differs from regular double crochet. Instead of yarning over, you insert your hook into the front sash of the previous double crochet, pulling up a loop. Think of this loop as your “yarn over.” Then, insert the hook into the next stitch and pull up another loop. With three loops on the hook, finish the double crochet as usual.
- Front Post Half Double Crochet (fphdc): Used for the ribbing, this stitch creates a beautiful raised texture.
Let’s Get Started
Below, you’ll find a photo of the Gemerald T-Shirt. For the complete step-by-step pattern, follow the link below.

Full Pattern: Click Here
Detailed Steps and Highlights
Raglan Increases
- Start with the Foundation Chain: Chain 82 (90, 90, 102, 100, 102) for the desired size and join the chain to form a circle.
- Round 1: Chain 2 (does not count as a stitch) and make 3 linked double crochets (ldc) into the same stitch (this is your increase). Place a marker in the center stitch of the increase to denote a “back” increase point.
- Continue working 1 ldc in each of the next 27 (29, 29, 34, 33, 33) stitches. Make another 3-ldc increase and place another “back” marker in the center of this increase.
- Work 1 ldc in each of the next 12 (14, 14, 15, 15, 16) stitches to the next “front” increase point. Repeat the increase sequence.
- Repeat Rounds for Yoke Formation: Continue increasing following the size-specific instructions until you’ve completed the required number of rounds. For sizes Medium and below, you’ll alternate between simple increases, while sizes Large and up may require larger increases as specified.
Shaping the Neckline and Separating the Sleeves
- Once you reach the desired yoke length, you’ll add extra rows to the sleeves and back sections to prevent the neckline from riding up in the front. This is done by breaking the yarn and reattaching it at a specific point marked in the pattern.
Working the Body
- After separating the sleeves, you’ll continue working the body in linked double crochet rounds to your desired length. Aim for a relaxed, comfortable fit by trying on the T-shirt as you go.
Adding Ribbing and Finishing Touches
- To create the ribbing, attach your yarn at the neckline or bottom hem and work in front post half double crochet (fphdc) to achieve a stretchy, textured finish. For the neckline, you can shape it slightly by decreasing ribbing stitches in the front section.
- If there’s a small flap at the underarm after separating the sleeves, you can seam it to the body with a tapestry needle.
Tips for a Great Fit
- Gauge Matters: Be sure to check your gauge in linked double crochet to ensure the correct fit. It’s especially important with this stitch to maintain consistency in the tension.
- Markers Are Your Friend: Keep track of your increases using stitch markers to avoid confusion and ensure even shaping.
- Customization: Feel free to adjust the length of the body and sleeves to suit your personal style. The pattern is flexible, and Michelle encourages you to make it your own!
A Stylish and Relaxing Project
The Gemerald T-Shirt is more than just a crochet project—it’s a chance to explore new stitches and create something beautiful and comfortable. With its thoughtful design and Michelle’s helpful video tutorials, you’ll find yourself enjoying each step of the journey. I hope you find as much joy in crafting this T-shirt as in wearing it! Happy stitching!


