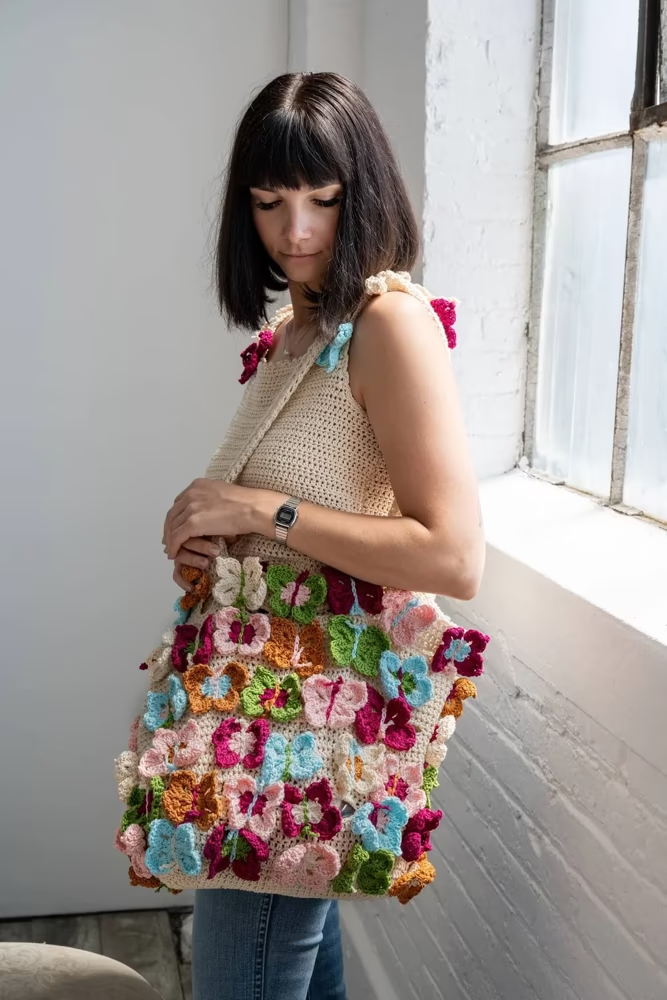
Crochet projects that combine functionality with charm are my favorite, and the Butterfly Bag is the perfect example. Inspired by the elegance of butterflies and the versatility of a tote, this design is a celebration of color and craftsmanship.
Whether you’re carrying groceries, books, or beach essentials, the Butterfly Bag adds a touch of whimsy to your everyday life. Its bold yet intricate design is surprisingly simple to create, making it an ideal project for crochet enthusiasts looking to explore creative patterns.
What Makes the Butterfly Bag Special?
The Butterfly Bag stands out for its unique combination of structure and embellishment. The roomy design makes it practical for daily use, while the decorative butterflies bring an artistic flair. With its vibrant 24/7 Cotton yarn and eye-catching texture, this bag is as durable as it is beautiful.
This project offers endless possibilities for personalization. You can mix and match colors for the butterflies, create patterns on the bag’s body, or adjust the size of the handles to suit your needs. It’s more than just a bag—it’s a canvas for your creativity.
Materials You’ll Need
To make your own Butterfly Bag, gather the following supplies:
- Lion Brand 24/7 Cotton Yarn:
- Ecru (#098): 3 balls (A)
- Aqua (#102): 1 ball (B)
- Magenta (#144): 1 ball (C)
- Grass (#172): 1 ball (D)
- Amber (#186): 1 ball (E)
- Pink Lemonade (#103): 1 ball (F)
- Hooks:
- Size F-5 (3.75mm) for butterflies
- Size G-6 (4.25mm) for the bag
- Tools:
- Stitch markers
- Large-eyed blunt needle
Helpful Tips Before Starting
- Check Your Gauge: To ensure the bag turns out as intended, aim for 16 hdc and 12 rows measuring 4 inches (10 cm).
- Practice the Magic Ring: The base of the bag and butterflies use this technique for a neat start.
- Track Your Progress: Use stitch markers to mark rounds and key points, especially for increases.
- Work Handles in Spirals: Handles are created in continuous rounds without joining, so keep your tension consistent.
- Customize the Butterflies: Experiment with different color combinations for the wings and body.
Step-by-Step Instructions
The Butterfly Bag is constructed in three main parts: the base and body, the handles, and the butterflies. Below is a sneak peek of the process. For the full pattern and detailed steps, click the link below:
Full Pattern: Click Here
Tips for Perfecting Your Butterfly Bag
- Butterfly Placement: Lay out your butterflies on the bag before sewing to find the arrangement you love. Use pins to hold them in place while attaching.
- Edging with Flair: The reverse single crochet stitch (also known as crab stitch) gives the bag a professional finish. Practice it on a scrap piece first if you’re unfamiliar with the technique.
- Secure the Handles: Use the long tails to sew the handles securely to the bag. Position them evenly to balance weight and avoid twisting.
- Mix Colors: Use leftover yarn to create additional butterflies or other embellishments for a unique touch.
- Add a Liner: For added durability and structure, consider sewing a fabric liner into your bag.
Personalize Your Butterfly Bag
Make your bag truly yours with these creative ideas:
- Color Themes: Match the colors to the season or your wardrobe.
- Additional Decorations: Crochet small flowers, leaves, or hearts to complement the butterflies.
- Size Adjustments: Increase or decrease the base and body rounds for a larger or smaller bag.
- Functional Upgrades: Add a zipper, buttons, or pockets to make your bag even more practical.
Wrapping Up: Your Stylish Tote Awaits
As you sew the last butterfly onto your Butterfly Bag, step back and admire your work. This project is a wonderful reminder of how creativity can transform everyday items into something magical.
Whether you use it for errands, outings, or as a gift, the Butterfly Bag is a stunning example of functional art. Let its wings inspire you to keep exploring and creating with crochet.
Happy stitching! 🦋


