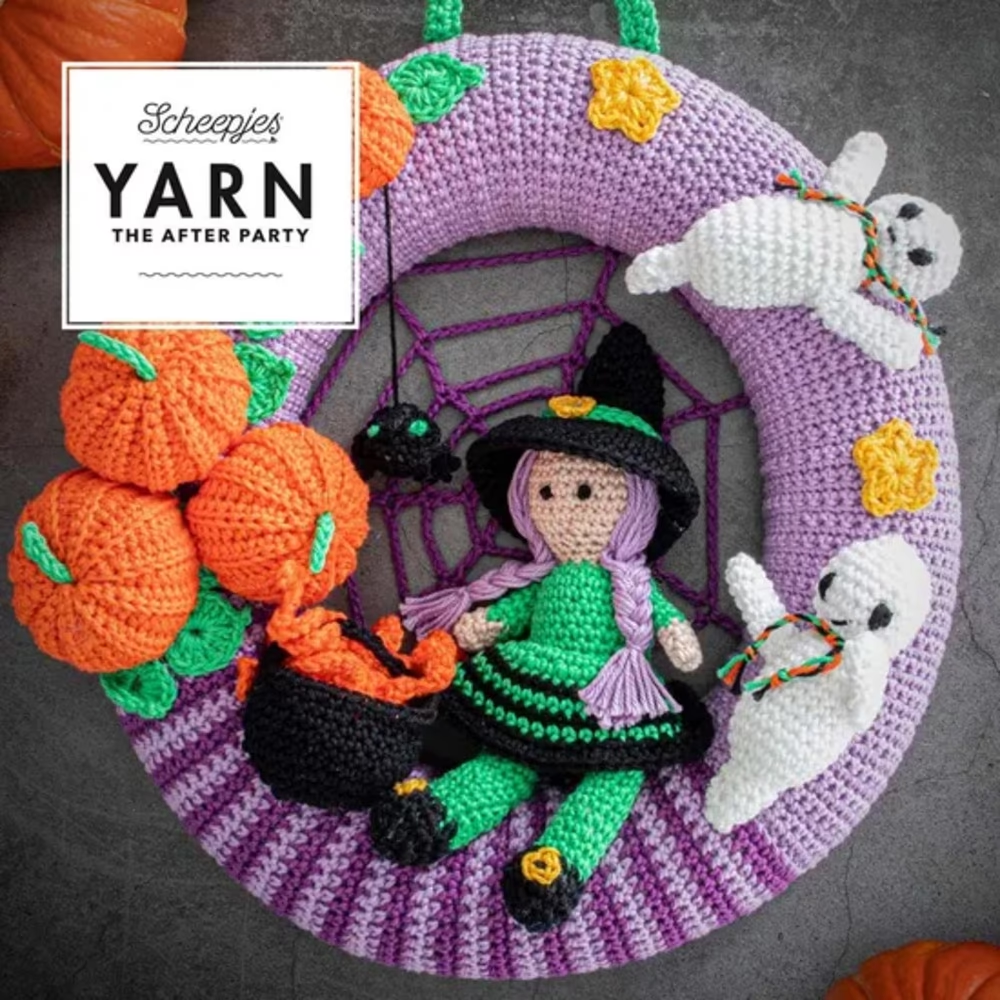
Halloween is right around the corner, and what better way to get into the spooky spirit than by crocheting your very own Halloween wreath? This pattern, designed by Val Pierce, is a fantastic way to add a handmade touch to your holiday décor. Featuring adorable pumpkins, ghosts, spiders, and a witch, this wreath is sure to bring a fun and festive vibe to your home.
If you love crochet and are looking for a seasonal project that’s both decorative and detailed, this Halloween wreath is perfect for you. Each component is worked separately, giving you the chance to enjoy making every spooky little detail. It’s also great for those who enjoy mixing colors and playing with different shapes!
A Halloween Wreath Full of Crochet Fun
This Halloween wreath is made up of several individual crochet pieces, all assembled together to create a playful and spooky scene. From the tiny pumpkins to the cobweb backing, each element brings its own charm. The pattern is worked in rounds for most of the pieces, including the witch, ghost, and pumpkins, and includes some fun techniques like picots and working in back loops only (BLO) to create texture.
You can make this project as spooky or cute as you like by changing up the colors or adding your own finishing touches. The pattern uses Scheepjes Catona mercerized cotton yarn, which gives each piece a beautiful finish and bright, vibrant colors.
Materials You’ll Need
- Yarn (Scheepjes Catona, 100% Mercerised Cotton):
- Yarn A: 282 Ultra Violet (2 balls)
- Yarn B: 520 Lavender (2 balls)
- Yarn C: 389 Apple Green (1 ball)
- Yarn D: 106 Snow White (1 ball, 25g)
- Yarn E: 110 Jet Black (1 ball, 25g)
- Yarn F: 263 Petal Peach (1 ball, 10g)
- Yarn G: 208 Yellow Gold (1 ball, 10g)
- Yarn H: 189 Royal Orange (1 ball)
- Other Supplies:
- 3mm and 3.5mm crochet hooks
- 30cm flat-back styrofoam wreath
- Polyester stuffing
- Hot glue gun (optional)
Key Techniques and Abbreviations
This pattern includes a variety of stitches and techniques, so here are some of the abbreviations you’ll need to know:
- Ch: Chain
- Dc: Double crochet
- Htr: Half treble crochet
- Tr: Treble crochet
- Dtr: Double treble crochet
- Blo: Back loop only
- MR: Magic Ring
- Ss: Slip stitch
- Picot: Ch 3, ss in third ch from hook
- Dc2tog: Double crochet 2 stitches together to decrease
The wreath includes a combination of basic crochet stitches and shaping techniques. Many pieces are worked in rounds, and some are worked flat. If you’re familiar with these basic techniques, you’ll be able to complete this project with ease.
Step-by-Step Instructions

Full Pattern: Click Here
Tips for Assembling Your Halloween Wreath
- Work Each Piece Separately:
This wreath is made up of individual parts, such as the pumpkins, cobweb, witch, ghosts, and other spooky elements. Take your time making each piece and enjoy the process of watching the wreath come together. - Stretching the Cobweb Backing:
The cobweb is crocheted in rounds and then stretched over the back of the wreath to create a spooky background. Pin it in place before sewing it to ensure that it’s evenly distributed around the wreath. - Use a Hot Glue Gun for a Secure Hold:
While you can sew all the pieces together, a hot glue gun can also help secure everything in place, especially when attaching the small decorations to the base of the wreath. - Finishing Touches:
Don’t forget the hanging loop at the top of the wreath! This small detail makes it easy to display your creation on a door or wall.
Making the Perfect Crochet Pumpkins
The pumpkins are one of the key elements of this Halloween wreath. You’ll crochet them in three different sizes: small, medium, and large. Each pumpkin is made by working in rows and creating a rectangle of alternating double and half-treble crochets in the back loop only (BLO). Once the rectangle is complete, you’ll sew the edges together, stuff the pumpkin, and gather the ends to shape it into a rounded pumpkin form.
The stalks are made using simple slip stitches in green yarn, and you can adjust their length to suit your preference.
Create Your Spooky Characters: The Witch and Ghosts
The witch is one of the stars of the wreath, crocheted from top to bottom with colorful details. Her body is worked in the round, and she has tiny arms and legs that you’ll sew onto the body. You’ll also crochet a simple skirt, hat, and even a little buckle for her shoes, adding charm to her overall appearance.
The ghosts are a cute addition to the wreath. They are crocheted from the bottom up and feature embroidered facial details. Their simple shape and flowing “body” give them a fun, haunting look.
Finishing Your Halloween Wreath: Final Assembly
Once all the pieces are complete, it’s time to assemble the wreath. Begin by stretching the cobweb backing onto the flat-back styrofoam wreath, pinning it in place, and sewing it down securely. Then, arrange all the characters and details around the wreath base, pinning them into position before sewing or gluing them down.
Make sure to place the pumpkins, witch, ghost, spider, and stars in a balanced arrangement to achieve a cohesive look. The final step is to add the hanging loop at the top of the wreath so you can display it proudly!
Wrap Up: Your Spooky Handmade Masterpiece
Congratulations! You’ve created a festive and spooky Halloween wreath that’s sure to become a highlight of your seasonal décor. This project is not only fun and creative but also a wonderful way to showcase your crochet skills. Whether you’re keeping it for yourself or gifting it to a friend, this wreath is bound to bring a touch of Halloween magic to any home.
Happy crocheting, and enjoy your spooky new wreath!


