Growing up, Christmas was always a magical time in my household. My mother was an avid quilter, and each holiday season, she would bring out an array of beautifully handcrafted quilts that transformed our home into a cozy winter wonderland. The tradition inspired me deeply, and as I grew older, I found myself drawn to the art of quilting, especially during the holiday season.
This year, I decided to revisit one of my favorite holiday projects: the Merry Stars Quilt. The original design, inspired by the festive fabrics from Ink & Arrow, was a smaller version I made for my family a few years ago. This time, I aimed to create a larger, more intricate quilt and share a detailed pattern for fellow quilting enthusiasts.
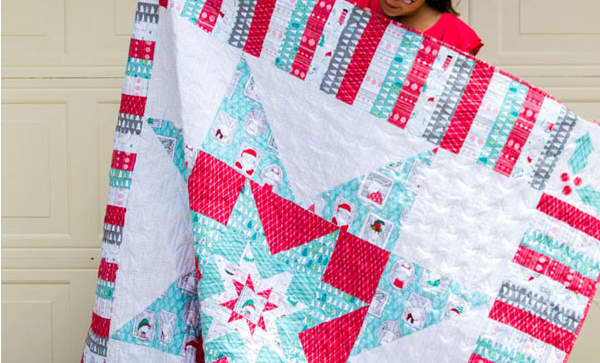
A Festive Starry Night: The Heart of the Merry Stars Quilt
The Merry Stars Quilt is a celebration of the holiday spirit, capturing the joy and warmth of the season in every stitch. This quilt features a striking star-in-a-star design, with each variable star growing larger towards the edges, creating a dynamic and visually appealing pattern. The use of vibrant Christmas-themed fabrics adds to its festive charm, making it a perfect addition to any holiday decor. In this guide, I’ll walk you through the process of creating Merry Stars Quilt, from selecting materials to the final quilting and binding.
Full Pattern: Click Here
Gathering Your Supplies: Essential Materials for the Merry Stars Quilt
To create the Merry Stars Quilt, you’ll need the following materials:
- 1 1/2 yards Pixie Dot White
- 1 yard Santa’s Crew Wintergreen
- 1 yard Linear Argyle Red
- 1/4 yard Christmas Trees Dark Wintergreen
- 1/2 yard Linear Argyle Medium Wintergreen
- 1/4 yard Christmas Pets Gray
- 1/2 yard Snowflake Stripe White
- 1/3 yard Christmas Pets Pale Wintergreen
- 1/3 yard Christmas Trees Gray
- 1 yard Snowflake Stripe Red (for binding and in piano keys border)
- 4 yards fabric for the backing
- HeatnBond Lite (for the Holly & Berries applique)
Setting Up for Success: Tips and Initial Considerations
Before diving into the project, it’s crucial to prepare your workspace and materials. Ensure you have a clean, organized area with ample space for cutting and piecing your fabrics. Keep your sewing machine in good working order, and have all necessary tools, such as rotary cutters, rulers, and pins, readily available.
Reviewing the pattern and instructions thoroughly before starting will also help you anticipate the steps and avoid any surprises along the way.
Creating the Star Blocks: Building the Foundation
- Cutting the Fabric: Begin by cutting all your fabric pieces according to the provided cutting chart. This step will set the stage for the rest of your quilting process, so take your time to ensure precision.
- Making the First Star Block in Merry Stars Quilt:
- Flying Geese Units: To Merry Stars Quilt, draw a diagonal line on the back of the 2 3/8” squares. Pin two squares to opposite corners of a 4 1/4” background square. Sew 1/4” away from each side of the drawn line, cut along the line, and press the triangles open. Repeat with the remaining small squares to create four flying geese units.
- Assembling the Block: Arrange the flying geese units with a 3 1/2” center square and 2” background corner squares. Stitch together in three rows, then sew the rows together to complete the block.
- Continuing with Larger Stars:
- Repeat the flying geese process using larger squares for the subsequent stars (12”, 24”, and 48”). Each completed star block becomes the center of the next larger star.
Adding the Borders and Appliques: Bringing It All Together
- Holly & Berries Applique:
- Trace the Holly & Berries pattern onto HeatnBond Lite and fuse them onto 10” corner squares. Stitch around the shapes as desired.
- Piano Keys Border:
- Divide twenty-four 2 1/2” strips into four sets. Sew six strips together to form a strip set approximately 12 1/2” x 42”. Subcut each set into four 10” pieces and sew together to create a 10” x 48 1/2” border piece. Repeat to make four border pieces.
- Final Assembly:
- Arrange the center star block, the corner applique blocks, and the border pieces. Sew everything together to complete the quilt top.
Quilting and Binding: The Final Touches
- Quilting:
- Prepare your quilt sandwich (quilt top, batting, and backing) and baste it together. Quilt as desired, whether by hand or using a machine, to secure all layers.
- Binding:
- Use the Snowflake Stripe Red fabric to bind the edges of the quilt, ensuring a neat and durable finish.
Additional Tips: Enhancing Your Quilting Experience
- Precision in Cutting: Accurate cutting is essential for clean, matching seams.
- Consistent Seams: Maintain a consistent 1/4” seam allowance throughout the project.
- Pressing Matters: Press seams carefully to avoid bulk and ensure a flat quilt top.
Creating the Merry Stars Quilt is a rewarding project that combines traditional quilting techniques with festive holiday fabrics. As you piece together each star and see the quilt take shape, you’ll experience the joy and satisfaction that comes from making something beautiful with your own hands.
This quilt is more than just a cozy addition to your home; it’s a celebration of the holiday spirit and a reflection of your creativity and craftsmanship. Happy quilting!


