Crochet has always been a comforting hobby for me, especially as the seasons change. When the crispness of autumn arrives, my crochet hooks are usually busy creating cozy projects that reflect the season.
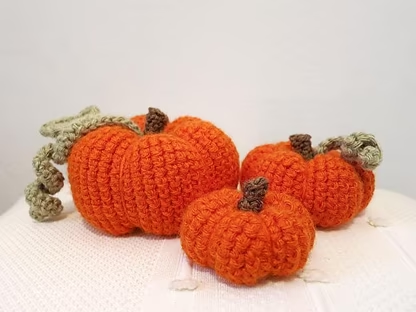
One year, I stumbled upon the idea of crocheting little pumpkins, and it quickly became my go-to project for fall. There’s something so charming about these tiny, plump amigurumi pumpkins—they bring a bit of whimsy to any space.
I love how versatile this pattern is, allowing me to make pumpkins in different sizes and colors to suit my decor. These little pumpkins also make perfect gifts and add a handcrafted touch to my home during the autumn months. In this article, I’ll walk you through how to create these delightful amigurumi pumpkins, which can be customized to fit your personal style and home decor.
The Art of Seasonal Crochet: Bringing Pumpkins to Life
Creating these amigurumi pumpkins involves a mix of basic crochet techniques and a bit of sculpting magic. By working in rounds and using simple increases and decreases, you can shape the pumpkin to give it that iconic, plump look.
What makes this project even more unique is the finishing touch—pulling the yarn through the center to create the characteristic segments of the pumpkin. Whether you are new to crochet or a seasoned crocheter, this pattern offers a fun and rewarding challenge.
The Perfect Stem and Vine Details
The charm of these pumpkins isn’t just in their round, plump bodies; it’s also in the details. The small stems and curly vines add a whimsical touch that makes each pumpkin unique.
You can play with the length and curliness of the vines to give your pumpkins different personalities. Plus, the addition of a small leaf here and there can transform these little gourds into an enchanting display.
Materials You’ll Need
To bring these amigurumi pumpkins to life, you’ll need the following materials:
- Worsted weight yarn: Orange, Brown, and Green
- Poly-fill stuffing: To give the pumpkins their shape
- Crochet Hook: Size 2.75mm
- Scissors
- Yarn needle: For sewing parts together
- Stitch marker (optional): To keep track of rounds
Preparing for the Project: Tips and Tricks
Before diving into the crochet process, it’s helpful to consider a few things. If you’re new to amigurumi, don’t worry—this project is beginner-friendly. Start with the small pumpkin to get the hang of the pattern, and then move on to the medium or large sizes as you gain confidence.
A tip from the designer: when making amigurumi, you can choose whether the “right side” or the “wrong side” of the crochet fabric faces outward. This pattern is demonstrated with the “wrong side” facing outward, which gives the pumpkins a slightly different texture. Feel free to experiment and see which look you prefer.
Step-by-Step Instructions
Below, you’ll find the step-by-step instructions to create these adorable amigurumi pumpkins. For the full pattern, simply click the link below.

Full Pattern: Click Here
Additional Tips for Success
- Stitch Markers: If you’re not used to working in rounds without joining, use a stitch marker to mark the beginning of each round. This will help you keep track of your stitches and ensure your pumpkin’s shape comes out evenly.
- Filling the Pumpkins: When stuffing your pumpkins, don’t overfill them. You want them to be firm but still soft enough to create the indentations that give them their classic pumpkin look.
- Segmenting the Pumpkin: When creating the segments, make sure to pull the yarn tightly enough to indent the pumpkin but not so tight that it distorts the shape. You can go over each segment multiple times for a more pronounced effect.
- Customizing Sizes: To create pumpkins of various sizes, experiment with different hook sizes and yarn weights. A smaller hook and thinner yarn will result in a smaller pumpkin, while a larger hook and thicker yarn will create a bigger pumpkin.
Exploring Variations and Creative Touches
Don’t hesitate to get creative with this pattern! Beyond the standard orange, try using different yarn colors to make a patchwork of pumpkins in creams, grays, or even pastel shades.
You can also add embellishments like embroidered faces for a spooky Halloween vibe or attach small buttons and beads for added texture. These pumpkins can easily be adapted into different seasons—use white yarn to make winter squashes or bright colors for a more whimsical display.
Celebrate the Season with Handmade Charm
Creating these amigurumi pumpkins is more than just a craft; it’s a way to embrace the cozy spirit of the season. Each pumpkin, with its unique shape and character, adds a touch of warmth and personality to your home.
As you make each stitch, you’ll find yourself slowing down, enjoying the process, and perhaps even feeling a bit more connected to the rhythms of the autumn season. So gather your materials, settle into your favorite crochet spot, and start crafting your own little pumpkin patch to celebrate the beauty of fall.


