Hello ladies! We hope all is well with you! Wanna make and Amigurumi Bear?
Here we are back again to share more crochet tutorials and some patterns to inspire you. We are still having a family vacation and it’s been amazing, but of course we found the time to publish one more article here.
Since we are currently on vacation, I decided to share an tutorial that is at the same time, easy and impressing!
The amigurumi bear is a craft that can be made with simple materials and practical tutorials.
As we said, it does not require complex crochet stitches and it can be a great therapeutical hobby for anyone.
The time to finish the item is dependable to the person’s experience and its size.
Despite there being a considerable level of difficulty, among all the kinds of amigurumi toys, the bear type is one of the most popular and easiest ones to be made.
The tutorial for today is for a specific type, but there are many cute designs that you can use as base for customizing yours as you prefer. Besides being able to make amigurumi items for yourself, you can give them as a gift and sell it as an item. So, enjoy the tips and step by step.
The amigurumi bear can be made using knitting or crochet techniques, and the materials such as needle and thread will depend on the stitches and technique chosen.
Basically, in addition to the needle and cotton thread, you will need a material to fill the toy, such as foam or silicone fiber.
The bear can be finished in 1 to 2 days if you have intermediate level skill, in the case of beginners this period can extend further.

For simple models, it is not necessary to be experienced in crochet/knitting, it is enough to know how to execute at least the basic stitches, such as low stitch, double stitch, and slip stitch. But the one on the tutorial is for intermediate level, so you’re going to need to perform ones such as the half double crochet and the sc2tog.
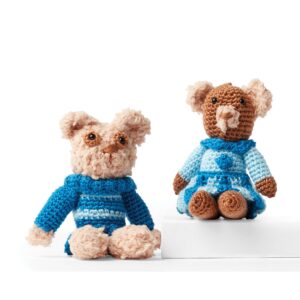
The tutorial for today is of a brother and sister bear featured in Red Heart texture. One wheel of yarn is enough for both toys and you will need to make single crochet and slip stitches. The tutorial can be downloaded on the following link! Have fun!
Now we’ll give you some extra models ideas! Check the out!
Giant Amigurumi Bear
The giant amigurumi bear stands out from the crowd and transmits a lot of joy in any situation.
The best way is to always keep it far from dust and clean it carefully to enjoy all of its charm for much longer.
Small Amigurumi Bear
Of the main advantages of the small amigurumi bear is the easy cleaning process, it’s also easy to tidy it up, after all it is easier to keep it anywhere.
It’s advisable that beginners start by making the amigurumi bears in small sizes, in that way you’ll get more experience to make the larger ones and feel safe by doing so.
Just as the giant amigurumi bear, you can customize your little bear your way, putting clothes or elements such as bows, ties, hats, and tiaras
Mini Amigurumi Bear
Taking into consideration the thoroughness of the mini amigurumi trim, extra cautious is necessary when you are making the stitches, so the piece is well finished. We recommend avoiding making thick line in this case.

The elements added to the piece must also be in miniature to fit harmoniously. In the end, what matters is learning various styles and tutorials to make the amigurumi bear of all sizes.
We would love to know your opinion about the tutorial we shared, and the tips here! Please leave a comment!
Have a great week!


