When I first started crocheting, I had no idea how much it would become a cherished part of my daily life. What began as a hobby quickly turned into an art form, one that allows me to create something tangible out of nothing but yarn and a hook.
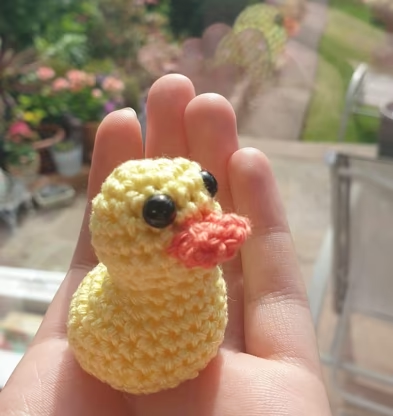
Daisy the Duck, my latest amigurumi project, is a perfect example of this. Small, adorable, and endlessly charming, Daisy has a special place in my heart—and I hope she’ll find a place in yours too. The beauty of amigurumi, for me, is its simplicity combined with creativity.
With just a few materials and some basic stitches, you can bring a cute character like Daisy to life. What I love most about creating her is how versatile she can be—whether she’s perched on your desk, given as a gift, or even tucked into your bag for travel, she’s always ready for a new adventure.
Crochet Magic: Bringing Daisy to Life
The process of crocheting Daisy the Duck is both soothing and satisfying. It’s not just about following a pattern but about connecting with the material in your hands and watching a little personality emerge as you shape each round of stitches.
Amigurumi is an ancient art form, with deep cultural roots in Japan, where tiny crocheted creatures known as “ami” have been popular for generations. This project allows you to join that long tradition while putting your own personal twist on Daisy.
With each increase and decrease, you’re not just crocheting stitches; you’re creating the very structure of Daisy’s form—her soft, rounded body, her beady eyes, and her playful little beak. The beauty of amigurumi lies in these small details, and this duck is no exception. Every stitch contributes to her character and charm.
Materials for Daisy the Duck
To crochet Daisy the Duck, you’ll need just a few materials. I always suggest choosing quality yarn for the best results and a good hook for comfort during your project.
- Yarn:
- King Cole Giza 4ply in yellow (A) – 1x ball
- King Cole Giza 4ply in orange (B) – 1x ball
- Crochet hook: 3.5mm
- Plastic safety eyes: 0.3cm
- Polyester stuffing
- Needle and thread: For sewing on the beak (or use the same 4ply yarn)
- Finished Size: Approximately 4cm by 3cm by 4cm
Setting Up for Success
Before starting, make sure to gather all your materials and set aside a quiet space where you can focus on your crochet. One key tip for success is ensuring your stitches are consistent; amigurumi often depends on tight, even stitches to hold the shape properly.
If you’re new to crocheting in rounds, practicing your magic ring technique before starting will help immensely since it’s crucial for Daisy’s body.
Also, don’t rush the stuffing process. Adding stuffing gradually as you crochet helps avoid lumps and ensures Daisy maintains a well-balanced shape. Pay particular attention to the back end, as this is what helps the duck sit properly without toppling over.
Step-by-Step Instructions
Below is where the step-by-step instructions for Daisy the Duck will appear. Click the link to access the complete pattern and follow along.

Full Pattern: Click Here
Extra Tips for Crafting Daisy
- Safety Eyes Placement: To get that perfect “cute” look, make sure the eyes are evenly spaced between rows 4 and 5, about 4 to 5 stitches apart. Proper placement will give your Daisy the charming expression she deserves.
- Shaping the Body: After you finish crocheting, you may need to reshape the body a bit by gently squeezing it. This ensures she has the right silhouette, especially around the back where the decreases are made.
- Stitching the Beak: When attaching the beak, take your time to align it perfectly with the body. Stitching along both the bottom and top edges will give her that adorable ducky smile.
Personalizing Your Daisy
You can easily add your own creative flair to Daisy by switching up the yarn colors. Maybe your Daisy will be a pastel pink or a bright blue duck instead of the classic yellow! You could also embroider little details like rosy cheeks or a bow around her neck. I love seeing how others make their creations truly unique.
The Final Touch: Enjoying Your Handmade Duck
As you crochet Daisy, remember to enjoy each step of the process. There’s something deeply fulfilling about taking time to create something by hand, stitch by stitch. Once you’ve finished, you’ll have more than just a cute duck—you’ll have a handmade friend that carries a little piece of your creativity with her wherever she goes.
Crafting Daisy the Duck is more than just following a pattern—it’s about embracing the joy of making and the pride of finishing something special. Whether you keep her for yourself or give her to someone else, Daisy will always be a reminder of the wonderful things you can create with just a bit of yarn and time.


